Showing posts with label gift card holder. Show all posts

Thursday, December 13, 2018

December Stamp Club Projects


Time is still flying by and I have another set of stamp club projects to share with you!  


The layout this month uses the Festive Farmhouse designer series paper and sprig punch.  It leaves lots of room to customize for your occasion!


Instead of two cards this time, I opted to make a gift card holder as one of our projects using a little striped treat bag.  It is folded in two places and there is a piece of Whisper White card stock inside to write on as well.  The belly band around it is made with Joyous Noel specialty paper and I used the Snow is Glistening stamp set for the label.


On the last project, I again used the Snow is Glistening stamp set and paired it with the Tufted dynamic impressions folder and Stitched shapes framelits.  I just love the double sided ribbon as well - unfortunately is it no longer available like the Joyous Noel specialty paper...


The gold foil edged cards and envelopes were a perfect match to use with the gold foil embossed background!
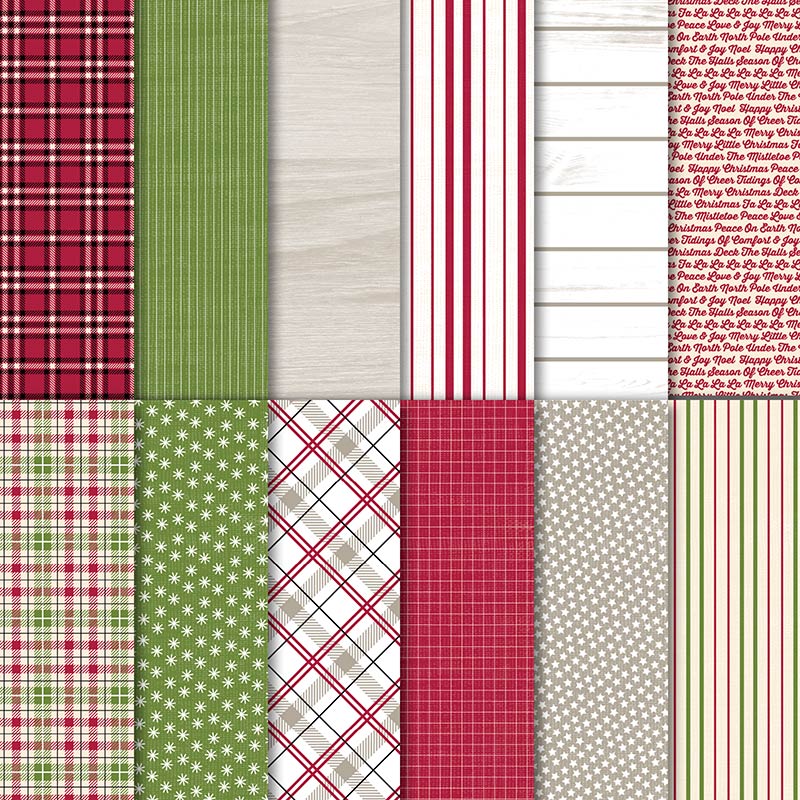
Festive Farmhouse 12" x 12" (30.5 x 30.5 cm) Designer Series Paper
Festive Farmhouse 12" X 12" (30.5 X 30.5 Cm) Designer Series Paper 147820
Price: $11.00
Rustic squares, wood patterns, and classic Christmas songs. Makes you think of comfy chairs and a crackling fire.

* 12 sheets: 2 each of 6 double-sided designs
* 12" x 12" (30.5 x 30.5 cm)
* Acid free
* Lignin free

Coordinating colors: Basic Black, Cherry Cobbler, Gray Granite, Mossy Meadow, Very Vanilla, Whisper White
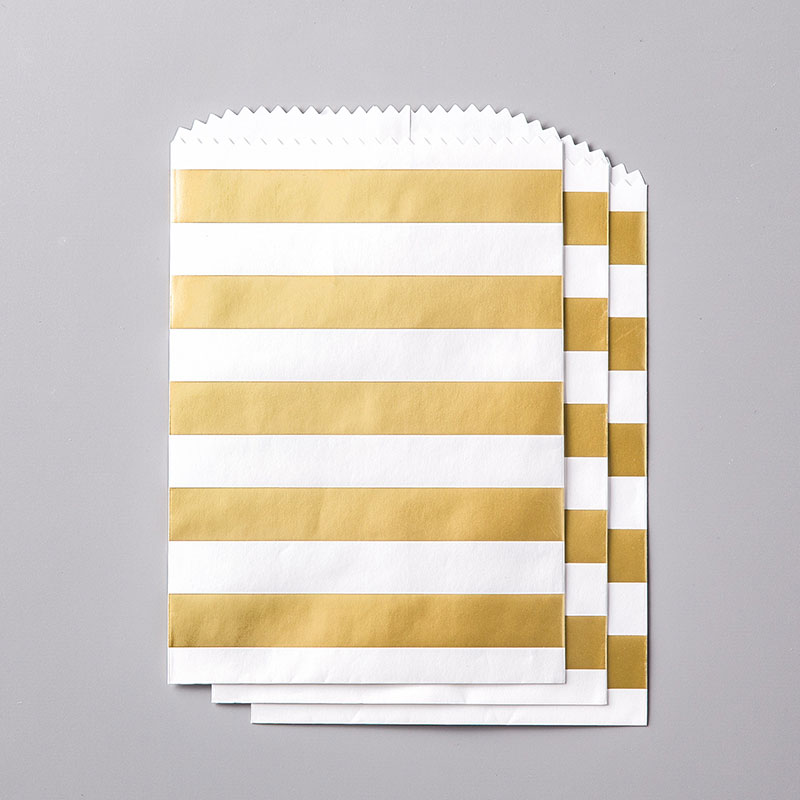
Striped Treat Bags
Striped Treat Bags 144255
Price: $5.50
Give a sweet treat in white treat bags with gold foil stripes.

* Stamp, spritz, or brayer on white sections to customize
* 10 bags. 4-3/4" x 7" (12.1 x 17.8cm)
* Food safe


Tuesday, March 21, 2017

Just Like You


I always like to have a few gift card holders on hand just in case I need something quick.  This one is really simple to put together and would work great for kids with the Party Animal designer series paper as the focus. 


I started with a piece of 12" x 4 1/4" of designer series paper and scored it on the long side at 4 and 8".  Then I cut the angle off one of the sides and used tear and tape adhesive to attach it to make the pocket.


Next, I added more tear and tape adhesive around the outside and added my cotton ribbon before decorating the front.

Supplies:
Super Duper
Emerald Envy, Pacific Point, Tip Top Taupe markers
Tip Top Taupe, Whisper White card stock
Party Animal dsp
2 1/2" circle punch
post signature
cotton ribbon
tear and tape adhesive

Monday, December 12, 2016

November Paper Pumpkin


I really loved last month's Paper Pumpkin kit, the only thing that would have made it better...?  Full sized cards instead of the smaller ones.  So I improvised and made them into 5 1/2" x 4 1/4" gift card holders.


The picture above is the original card idea for which the kit was intended.  Below is the alternative version...


I put tear and tape adhesive on three sides of the back of the front piece so that a gift card could be placed in the top.


The background piece was embossed with the Pine Boughs folder before I added gift card holder piece.

Supplies:
November 2016 Paper Pumpkin kit
Dapper Denim card stock
Pine Bough folder
tear and tape adhesive

Remember, you can sign up for a monthly Paper Pumpkin kit at any time or give them as gifts!  Just go here to get started!

post signature

Friday, December 2, 2016

Mini Treat Gift Card Holders


I have been playing around with my Mini Treat Bag thinlit lately and put together a bunch of little gift card holder treat bags. Below are some of the Christmas themed ones, but I also made a few birthday. 


I started with some This Christmas Specialty Designer Series paper and cut out my pieces with the Big Shot and the Mini Treat Bag thinlit die. 


Then I took some scraps of the same specialty paper, Basic Gray and Very Vanilla card stock and
added my sentiment and some layers on the front of the bag.  Inside I added a piece of Very Vanilla card stock that a gift card holder and note could be added to.


Supplies:
Wonder of Christmas
Garden Green, Smoky Slate ink
Basic Gray, Very Vanilla card stock
This Christmas specialty designer series paper
tear and tape adhesive
banner triple punch
Mini treat bag thinlit
post signature

Friday, June 6, 2014

Enjoy a Little Something


This is my first attempt with the Hamburger Box Bigz XL die that is in the new catalog and I used the Maritime designer series paper.  I also used the tags that you can cut out using the end of the die and made some Coastal Cabana pieces to tie onto the closed box with Baked Brown Sugar thick baker's twine. 


Behind the heart cutout, I added a piece of watercolor paper that I had colored with an aqua painter and some Coastal Cabana ink.

 
The Red Glimmer paper heart punch is from the Itty Bitty Accents punch pack (also a new item).

 
I thought I would make a little coordinating card as well, the card measures 4 1/4" x 3 1/4" closed (use a 4 1/4" x 8 1/2" piece of card stock to start with) and I scored at 4 1/4" and 2 1/8" on the 8 1/2" side.

 
Again, I used the Maritime designer series paper and I added a small pocket on the back panel so a gift card could slide into it.  The pocket measures 3 1/2" x 1 1/4" and I put sticky strip on the sides and bottom, leaving the top open for the gift card.

 
Since the card is an unusual size, I pulled out my envelope punch board and whipped out a quick Real Red envelope as well.
 
Supplies:
Num Num
Night of Navy ink
Coastal Cabana, Real Red, Whisper White card stock
Maritime dsp
Envelope Punch board
Hamburger Bigz XL die
watercolor paper
aqua painters
extra large oval punch
sticky strip
Baked Brown Sugar thick baker's twine
 
post signature

Sunday, December 29, 2013

Envelope Liner card


Even though the Holiday season is about over, I know I still use gift card holders for other occasions and thought I would share a quick one I made with the Good as Gold card kit (SAB 2014).


I took 2 liners and attached them with sticky strip to make a pouch and then folded over on of the top flaps.  Next, I cut one of the note cards down and covered the front of the pouch with it, added some Baker's twine and a few pieces from the card kit.  The insert is made from the other part of the note card I cut up and I taped the gift card to that.

 
Supplies
Good As Gold card kit (SAB 2014)
Sticky Strip
post signature

Sunday, July 14, 2013

Non Winning Artisan Project #3

 
Stampin' Up! encouraged us to use My Digital Studio on some of our Artisan Award entries again and I am comfortable doing that with my scrapbook pages, but not so much with the cards.  I forced myself to do a hybrid though and this is one that I just didn't love when it was time to send it off.

 
I added some texture with the Chevron folder, a button and some designer brads.

 
And on the inside made a pocket for a gift card and added some more digital splatter.

 
Supplies:
My Digital Studio
Blue Ribbon
Island Indigo, Rich Razzleberry, Whisper White card stock
Melon Mambo, Rich Razzleberry ink and digital ink
Neutrals designer buttons
In color designer brads
Chevron folder
Scallop dots Melon Mambo ribbon
 
post signature

Thursday, December 1, 2011

Another gift card holder idea

Here is another gift card holder sample for the Late Night Stampers this week.  I used a design created by Andrea Walford for this one and it has a little belly band around it.


The stamp set is Gifts of Christmas and I used some retired paper from a Simply Scrappin' kit that was out last year.


Another quick and easy holder that was lots of fun to make.

Thursday, November 11, 2010

Tin gift card holder

I saw a few samples of these tins made into gift card holders and wanted to try it out.  I can't remember who created the sample I looked at on Stampin' Connection, but if it was you, please let me know and I will give you credit :)

Most of the items used to make these were found in the Clearance Rack!  Aren't these little snowflakes awesome and they match our current colors as well.


I added a tag from the Two Tags die as a note and the gift card would slide in the pocket on the right side.
I also used the Northern Flurry Impressions folder and the Season of Joy Stamp set.  The colors are Baja Breeze and Riding Hood Red.

Blog Archive

About Me

My photo
I am a mom, wife, farmer and Stampin' Up! demonstrator from North Dakota. I love to stamp and scrapbook and share ideas with others so I thought I would try out a blog. Hope you enjoy it!