Showing posts with label box. Show all posts

Friday, November 23, 2018

A Little Christmas Spirit


Last weekend at a semi annual scrapbooking/stamping retreat, I taught a class on the project below - a set of shadow box Christmas ornaments and a box to gift them in.


The box is decorated with the Dashing Along designer series paper and the Star of Light stamp set.


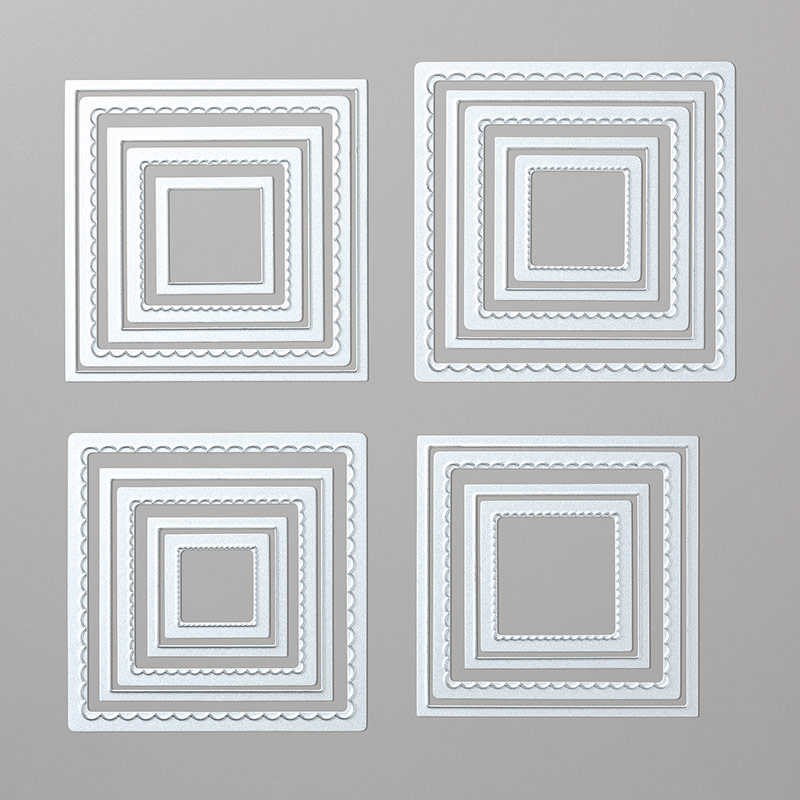
I used the Squares collection framelits to die cut the bases and tops of the ornaments - while these dies are retired, you could also make smaller ornaments with the Layering Squares framelits that I have below...

Supplies:
Star of light and various retired Stampin' Up! sets
Garden Green, Cherri Cobbler, Crumb Cake ink
Whisper White, Crumb Cake, Cherry Cobbler, Garden Green card stock
Stitched Shapes framelits
Squares collection framelits (retired)
Deco label framelits (retired)
ribbon
embellishments


Star Of Light Photopolymer Stamp Set
Star Of Light Photopolymer Stamp Set 142110
Price: $26.00
Add elegance to your Christmas projects with the graceful designs and sentiments in this set. Combine images and thoughts to create classic cards and gift tags that have your personal touch.

This is a Two-Step Stampin’ set. Combine individual stamps to create the final image you want in the colors you want.

Photopolymer stamps
* Are totally transparent for perfect image placement.
* Have just enough give to create a perfectly stamped image every time.
* Cling like crazy to our clear blocks so you don't have to worry about slipping.
* Save space—you need only one set of blocks for all your photopolymer stamps (blocks sold separately).
* Come packaged in cases with images on the spine for easy storage and quick reference.

Quantity: 21 photopolymer stamps
Suggested clear blocks (sold separately): a, c, e
Layering Squares Framelits Dies
Layering Squares Framelits Dies 141708
Price: $35.00
Create die-cut squares in seconds with Framelits dies and the Big Shot. Framelits’ open design allows you to place them where you want for precise cutting.

* 19 dies
* Largest image: 3" x 3" (7.6 x 7.6 cm)
* Use with Big Shot


Tuesday, November 22, 2016

Joy of Christmas Boxes


I was playing around with a little box idea one day and came up with these Christmas themed boxes using the Candy Cane Lane specialty paper and Christmas Magic stamp set.


Each box measures 4" x 5" on the inside and has 1" sides.  I used Tip Top Taupe  and Real Red for the boxes and coordinating decorations.


On the first one, I strung some mini jingle bells on baker's twine in on corner of the stamped piece.


On the second one I added some thick baker's twine behind the stamped piece and some Metallic enamel shapes as an accent.


These would work for fun little gift items or gift cards.


Supplies:
Christmas Magic
Basic Black, Real Red, Tempting Turquoise, Pumpkin Pie ink and markers
Real Red, Whisper White, Basic Black, Tip Top Taupe card stock
Tear and Tape adhesive
paper trimmer
mini jingle bells
metallic enamel shapes
Candy Cane Lane specialty paper
bakers' twine


post signature

Tuesday, September 13, 2016

Jingle Bell Box


Although it may not look like it, today's projects uses quite a few of the same products as yesterday's card.  The stamp set and one of the designer series paper packs as well as the ink color and a couple of the card stock colors...


To start off, I had a piece of 5" x 9" Crumb Cake card stock and I scored it at 1", 4", 5" and 8" on the long side and 1" and 4" on the short side.  I made my cuts to fold it into a box and then added some layers of decoration...


The bellyband around the box is made from Presents and Pinecones designer series paper and since the full length of the 12" designer series paper was just a little bit too short to wrap around, I added a jingle bell where the two ends meet to make it look like it is long enough as you can maybe see in the picture below.


My jingle bells were stamped, colored and cut out.  After I colored them I added some shimmer with the Wink of Stella glitter brush.


Supplies:
Christmas Magic
Basic Black, Delightful Dijon, Cherry Cobbler ink
Crumb Cake, Cherry Cobbler, Dapper Denim, Whisper White card stock
Warmth and Cheer dsp
Presents and Pinecones dsp
In color Doilies
Burlap ribbon
scallop circle punch


Thursday, July 21, 2016

Happy Day Box


Yes, I am still playing with the June Paper Pumpkin kit even though my July kit arrived over the weekend!  This is an alternative project that you could make using one of the card bases to make a little box.  The box is big enough for a little treat or a gift card.


My score lines are all at 1/2" and I used the original score line where the card would be folded as one of the folds.


Since there was already a hole on one side of the crease on the top of the box, I added another and put the baker's twine through it before tying up the sequin banner. 


Supplies:
June Paper Pumpkin


post signature

Thursday, August 14, 2014

Burlap and Lace

I am always on the lookout for fun things to alter when I get a chance to shop.  I came across this paper mache box awhile ago and had not done anything with it yet.

 
Right now it is empty, but I thought it would be a great box for a gift of any kind, a card set or even just a display piece.

 
I added some Flashback designer series paper (I just LOVE the versatility of this paper pack!).  Then, I added some Venetian crochet trim around the top and bottom attaching it with a random glue dot here and there.

 
Next came the silver basics buttons, again attached with glue dots...

 
And finally the burlap and Venetian crochet trim on the top (this is attached with sticky strip.
 
Supplies:
Flashback dsp
Burlap ribbon
Venetian crochet trim
silver basic buttons
glue dots
snail adhesive
sticky strip
post signature

Thursday, January 16, 2014

Another Great Year Box


I have a simple little box to share with you today using the Another Great Year stamp set from the Occasions catalog. 

 
The box base is Bermuda Bay and Very Vanilla and is decorated with Retro Fresh designer series paper and Soft Suede card stock. 

 
The bottom of the box slides out and since this was a gift I put together fairly quickly I don't have the measurements for you, but will probably make another one and can post them then.  It contained some goodies that I had created in this project so there was also an insert to hold them in place. 
 
One thing I love about the stamp set I used for this project is the size of the image.  It doesn't need anything else with it, but you could also add to it if you wanted with markers or embellishments. 
post signature

Wednesday, November 20, 2013

Frosted Earrings


Some of our embellishments are so much fun to play with!  The frosted finishes embellishments especially - for this project, I make a quick pair of earrings with them and a fun little gift box to go along with it.


I made a belly band for the little pizza style box...

 
and punched a couple 1/8" holes to put the earrings into on the inside.

 
Fun and different little gift, ready for giving!

 
Supplies:
Label love
Calypso Coral ink
Raspberry Ripple, Whisper White, Baked Brown Sugar card stock
Frosted finishes embellishments
in color designer series paper
 
Artisan label punch
post signature

Saturday, June 8, 2013

Teacher Gift Revisited (with box tutorial)

 
I have had some requests for instructions to make the box I used for my teacher gift in this post awhile back so I decided to update it with new catalog products and share some instructions. 
 
 
I decided to go with the I Am Me designer series paper and the Yippee-Skippee stamp set for the updated version.  I also used the cycle Celebration stamp set and the Deco Labels collection framelits.

 
You will need a 12" x 10" piece of card stock.  It will be scored at 2" and 8" on the short side and 3", 4", 5", 6" and 7" on the long side.  You will see in the picture above where to cut and where you will just fold.

 
I made two sections on the inside of the box by folding up 5" score line and using sticky strip to keep it together.

 
I used the sticky strip all the way across and then cut the notches as shown above.  Attach the folded flap to the side with sticky strip and then continue to use sticky strip to put the sides together.


This is the inside of the box showing the divider.

 
Ready to decorate!

 
My dsp pieces were 2 3/4" x 5 3/4", 4 3/4" x 5 3/4", and 2 - 1 3/4" x 4 3/4" with a 1" 5 3/4" strip over the top of the one on the front.

 
I found some fun straws and Michaels that were a pretty close match to Calypso Coral and added them to a 1" x 8" cello bag.  There is a drink mix pouch in the box near the straws although you can't see it.
 
 
There are a couple cards in the box as well as a coaster sticky note pad.  I will share the cards with you tomorrow!  My original box included a decorated candy bar, but we didn't have one around the house this time.

 
Supplies:
Yippee-Skippee
I am Me dsp
Calypso Coral ink
So Saffron, Basic Gray and Whisper White card stock
Deco labels collection framelits
Simply Scored tool
Sticky strip
Bone folder
In color Boutique Details


Monday, May 20, 2013

Teacher Gifts

 
The Late Night Stampers challenge this week is Teacher gifts...
 
I always like to give my kid's teachers a little thank you at the end of the year, I know it is something I couldn't do and I am grateful for them.
 
 
I put together this little box and decorated it with Tea for Two dsp and some Oh Hello stamped images.  The green striped things are cool straws I found and I put them into a 1" x 8" cello bag.

 
I added a wrapped up candy bar, post it note holder, decorated water bottle and flavor packet, a pen and some note cards.

 
One down, two to go!
 
Come on over and see what the team has created to inspire you!

Thursday, September 15, 2011

Brights boxed set

Another sample project for the Late Night Stampers challenge of using In Colors this week, although this time I didn't use 2 of them.  I have chosen Lucky Limeade  as my In color choice and matched it with Melon Mambo, Rich Razzleberry, Daffodil Delight and Whisper White.


The cards are very simple and easy and I used the Tagtastic stamp set along with a bunch of different punches.


You can find directions for the box at http://www.frenchiestamps.com/ .  I used her basic directions, but changed the front a little bit.


Supplies:
Brights pattern pack dsp
Tagtastic stamp set
Melon Mambo, Rich Razzleberry, Lucky Limeade, Whisper White, Pretty in Pink, Daffodil Delight card stock
Melon Mambo, Lucky Limeade, Rich Razzleberry, Daffodil Delight classic ink
Rich Razzleberry dotted ribbon (retired)
Daffodil Delight 5/8" grosgrain ribbon
sticky strip
dimensionals
flower punch
extra large oval punch
1" circle punch
1 1/4" circle punch
decorative label punch
lace ribbon border punch
scallop circle punch
2 3/8" scallop circle punch
1 3/4" circle punch
bone folder
antique brad
velcro

Saturday, February 5, 2011

Little boxes

I found these adorable little boxes on our demonstrator site (and can't find them again to give the creator credit at the moment - will keep looking and update!!). 


I plan to use this as one of our Stamp Camp projects this week and will show you the other creations in the future.


Blog Archive

About Me

My photo
I am a mom, wife, farmer and Stampin' Up! demonstrator from North Dakota. I love to stamp and scrapbook and share ideas with others so I thought I would try out a blog. Hope you enjoy it!