Showing posts with label 3d. Show all posts

Tuesday, October 31, 2017

Musical Joy Star


Here is another version of the wooden star project I shared with you awhile ago, instead of stamping, I chose to use die cut letters on this one and layered some Merry Music specialty paper over some Smoky Slate card stock.


I added some green sprigs, a mini ornament, 7/8" striped ribbon and some adhesive rhinestones as well.  


Supplies:
Pink Pirouette, Smoky Slate card stock
Merry Music specialty paper
Basic rhinestones
Large letters framelits
7/8" striped ribbon
green sprigs
mini ornaments


Tuesday, September 12, 2017

Joyful Star


I found some cute wooden stars recently and decided I wanted to play around with decorating them in a holiday theme.  This is the first creation using the Cheers to the Years stamp set.


I tried to tie in the colors that the star was already painted in with the inks and card stock colors so I chose Whisper White, Pink Pirouette, Soft Suede and Crumb Cake.  


We have some super fun embellishments in the Holiday catalog that I also added - Green Sprigs and Mini ornaments and then I added some burlap ribbon and rhinestones for more accents.  The layers are added with a glue gun with the exception of the card stock.

Supplies:
Cheers to the Years
Pink Pirouette, Crumb Cake, Soft Suede ink
Soft Suede, Whisper White card stock
Burlap ribbon
Starburst punch
Mini ornaments
Linen thread
Green sprigs
Rhinestones


Tuesday, May 23, 2017

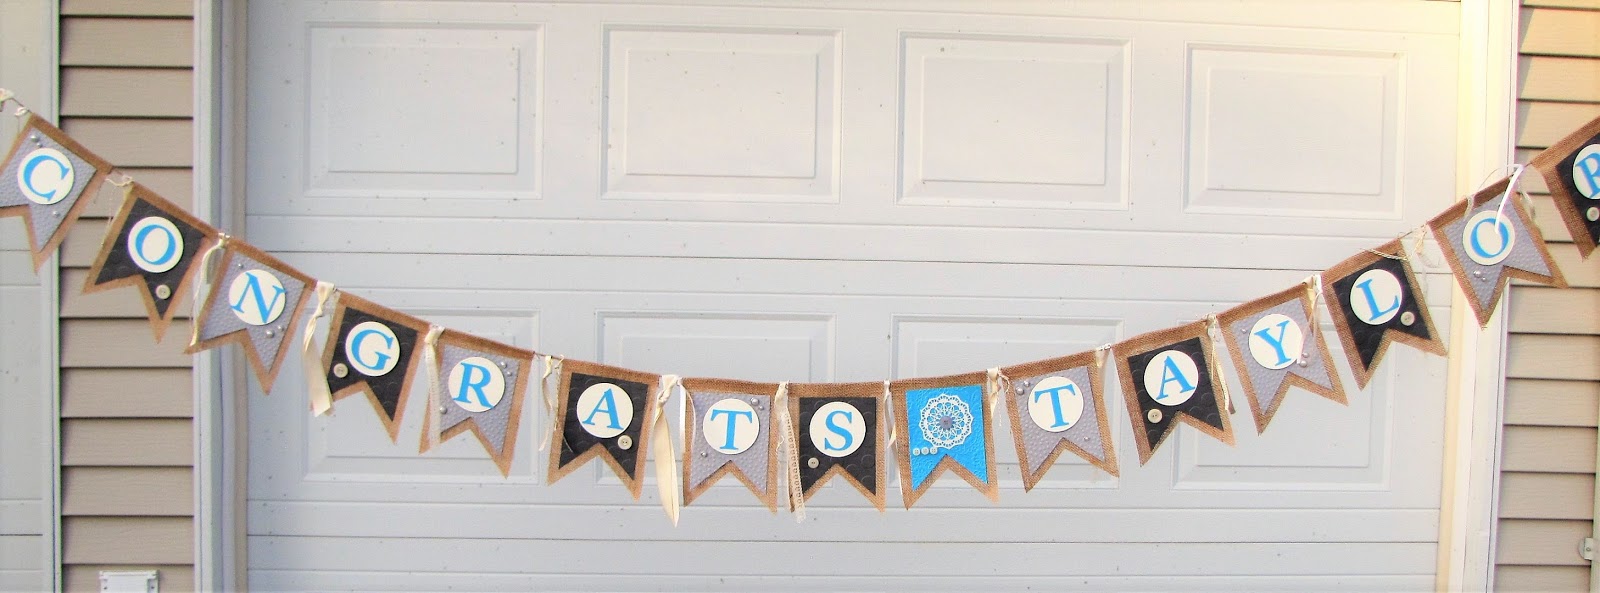
More Graduation!

I think banners are about the hardest thing for me to photograph!  Especially if they are kind of large like these are...A customer asked me to make some banners for a family member's graduation this spring and gave me some ideas for colors and materials. 


These are the ones I came up with, each banner has the same background burlap, but the designs are a little different.


On the one below, I had to free hand the card stock layer that went over the burlap because I didn't have a die that would work to cut them out.


I added layers and textures to each banner piece as well as accessories and lots of different ribbon tied between all of the pieces.


I chose to use the Decorative Dots and Large Polka Dots embossing folders, the Top note die, circles framelits, Stitched Shapes framelits and some retired alphabet dies.


Lots of buttons, pearls, doilies, etc...


I attached the card stock to the burlap with Velcro because I knew it would be strong and that way the banner pieces could maybe be recycled as well.


This photo shows the textures a little better...


I always have fun putting together projects for customers like this or even things totally different!


Thursday, January 5, 2017

Urban Letters


In the last couple weeks I have been trying to do some stamp room cleaning and ran across some wooden letters I had purchased with the intention of decorating for my boys. 


I decided to so some simple decorating with the new Urban Underground specialty paper, burlap ribbon and Urban Underground embellishments.


The designer series paper is added to the letters with the tear and tape adhesive.  Before I got to that point, I just placed the letter on the designer series paper and used a pencil to make my pattern.  A little trimming was necessary to make it fit the way I wanted it to but it didn't take long.


The burlap ribbon is attached in the back with washi tape and the Urban Underground embellishments are self adhesive.


Supplies:
Wood letters
Urban Underground dsp and embellishments
burlap ribbon
tear and tape adhesive
washi tape


post signature

Tuesday, November 22, 2016

Joy of Christmas Boxes


I was playing around with a little box idea one day and came up with these Christmas themed boxes using the Candy Cane Lane specialty paper and Christmas Magic stamp set.


Each box measures 4" x 5" on the inside and has 1" sides.  I used Tip Top Taupe  and Real Red for the boxes and coordinating decorations.


On the first one, I strung some mini jingle bells on baker's twine in on corner of the stamped piece.


On the second one I added some thick baker's twine behind the stamped piece and some Metallic enamel shapes as an accent.


These would work for fun little gift items or gift cards.


Supplies:
Christmas Magic
Basic Black, Real Red, Tempting Turquoise, Pumpkin Pie ink and markers
Real Red, Whisper White, Basic Black, Tip Top Taupe card stock
Tear and Tape adhesive
paper trimmer
mini jingle bells
metallic enamel shapes
Candy Cane Lane specialty paper
bakers' twine


post signature

Friday, September 23, 2016

Cookie Cutter Ornaments


I saw some cute cookie cutter Christmas ornaments online one day and wanted to try a few out for myself. 


The first thing I did was pick out my paper.  Then, I cut a piece that was slightly bigger than the ornament and pulled out my fine tip glue pen. 


  I set the paper down with the ornament on top and added a generous coating of glue to the inside edges. 


After that dried, I used a sharp knife to trim around the ornament. Then on to the fun stuff!


I added some more glue and chunky glitter around the edges.  Each one has a little Christmas trinket hanging inside on the Candy Cane Lane baker's twine that will also hold the ornament on the tree.


To embellish them, I used the Starlight thinlits, basic pearls, and the Christmas magic stamp set.

Supplies:
Christmas Magic
Basic Black, Cherry Cobbler, Delightful Dijon ink
Whisper White, Emerald Envy, Bermuda Bay card stock
fine tip glue pen
Christmas trinkets embellishments
chunky glitter
basic pearls
Presents and Pinecones dsp
cookie cutters
Candy Cane Lane baker's twine

Monday, August 29, 2016

Give Thanks

I have another altered craft store find to share with you today.  I found a 5 pack of these wooden pieces, they are about 8 1/2" x 11" in the clearance section and knew I could find some fun things to do with them. In fact two of my nieces and my daughter made their own versions of this project too!


I started off using the Timeless Textures stamp set and randomly stamping the images in different colors - Soft Suede, Pool Party, Soft Sky, Crumb Cake, Sahara Sand...then I added some denim paint that I had left over from some other projects just kind of brushing it in random spots. 


I added some lace trim and burlap ribbon to the bottom and the started with my layers.  There is some Smoky Slate card stock embossed with the Cable Knit folder, Serene Scenery designer series paper and some chicken wire that I cut into about a 6" x 4" piece.


My sentiment is from the Suite Seasons stamp set, a very versatile holiday greeting set in the Holiday catalog. 


I also used a couple retired Stampin' Up! items, I always love the little flowers and have many of them left over to play with now and then!


Supplies:
Timeless Textures, Suite Seasons
Soft Suede, Pool Party, Soft Sky, Crumb Cake, Sahara Sand, Dapper Denim, Delightful Dijon ink
Smoky Slate, Dapper Denim, Very Vanilla, Delightful Dijon card stock
Serene Scenery dsp
lace trim
burlap ribbon
in color doilies
Cable knit folder
gold binder clips


post signature

Thursday, July 21, 2016

Happy Day Box


Yes, I am still playing with the June Paper Pumpkin kit even though my July kit arrived over the weekend!  This is an alternative project that you could make using one of the card bases to make a little box.  The box is big enough for a little treat or a gift card.


My score lines are all at 1/2" and I used the original score line where the card would be folded as one of the folds.


Since there was already a hole on one side of the crease on the top of the box, I added another and put the baker's twine through it before tying up the sequin banner. 


Supplies:
June Paper Pumpkin


post signature

Tuesday, April 26, 2016

Printer's Tray


As part of my dad's birthday gift a week or so ago, I made this printer's tray for him with a photo I took of him and three of his grandchildren last summer at the lake. 


I seem to get the best pictures of dad and the kids at the lake so it just seemed like a good photo to use even though there are three of the grandkids missing from this one. 
 
 
I used some English Garden designer series paper, corrugated paper and Lost Lagoon, Night of Navy, Old Olive and Tip Top Taupe card stock.


For stamp sets, I chose the Going Global, In the Meadow and All about Everything sets.  All about everything is the one we received as a bonus in the last Paper Pumpkin subscription.

 
I added some enamel dots and buttons for accents as well.
 
Supplies:
Going Global, In the Meadow, All about Everything
Night of Navy, Old Olive ink
Lost Lagoon, Tip Top Taupe, Old Olive, Night of Navy card stock
corrugated paper
English garden dsp
enamel dots
circle punches
linen thread
designer buttons
printer's tray
 
post signature

Friday, March 11, 2016

Long Altered Notepad

 
Quite awhile ago I went into an office supply store and purchased a package of note pads and then had them cut the pads into 3 pieces the long way... Well needless to say you end up with quite a few notepads and I have lots left to use up!  

 
I put this one together quickly by cutting a piece of the white card board that comes with the designer series paper packages  and adding some Neutrals color collection designer series paper to it with a glue stick. 

 
Then, I attached the note pad to that with some tear and tape adhesive and added some decorations using the All God's Grace stamp set, itty bitty punches and basic rhinestones.
 
Supplies:
All God's Grace
Basic Gray ink
Whisper White, Soft Sky and Calypso Coral card stock
decorative label punch
itty bitty accents punches
basic rhinestones
Neutrals color collection dsp
English garden dsp
 
post signature

Friday, January 29, 2016

Time for Tea

 
In the past I have shared projects created with the little wooden box that we get each year with cheese inside from a potato customer in Wisconsin.  I have made a little card box and created cards that fit perfectly inside and also a little box for my daughter to keep her small scrapbooking supplies in.

 
This time around I chose the stamp set a Nice Cuppa and paired it with the rest of the bundle that you can find here.


I first die cut quite a few pieces from the Cups and Kettles dies and then I added a few embellishments or stamped images to them.

 
Then, I added my matted designer series paper to the sides and top of the box.

 
After adding the elements to the designer series paper, I took some cotton paper and used it like tissue paper on the inside before adding a few bags of tea.

 
It will come I handy for a door prize at a future Stamp A Stack!

 
Supplies:
A Nice Cuppa
Pool Party, Soft Suede ink
Pool Party, Mint Macaron, Watermelon Wonder, Soft Suede card stock
Have a Cuppa dsp
Have a Cuppa embellishments
2015 - 2017 in color blossom accents
Cups and Kettles thinlits
1" circle punch
cotton ribbon
linen thread
designer series buttons
tear and tape adhesive
 
post signature

Blog Archive

About Me

My photo
I am a mom, wife, farmer and Stampin' Up! demonstrator from North Dakota. I love to stamp and scrapbook and share ideas with others so I thought I would try out a blog. Hope you enjoy it!